Showing posts with label Tried and True Recipes. Show all posts

Thursday, January 29, 2015

Peanut Butter Protein Fudge

Peanut Butter Protein Fudge

So this is something that a couple of my friends were eating as snacks last summer. It tasted like peanut butter honey candy fudge. Dessert. At that time, my son was going through a phase of eating nothing but kids granola bars that had a 1000 ingredients. After my friends shared their similar recipes, I knew it was a treat I wanted to make for my family and I was hoping it would replace my son's bars.

Ingredients
16 ounces of natural peanut butter
1 1/4 cup of honey
2 scoops protein powder
2 1/4 cups of oats
3/4 cup of flax seed powder

Directions
Prepare a 9x13 baking pan by lining it with parchment paper. Empty the peanut butter into a microwave safe bowl and heat for one minute. Stir. If it's not soft, keep heating it in 30 second intervals. Combine the peanut butter and honey first.  Then add in the last three ingredients and mix well. Press the fudge into your prepared pan and cool in the fridge for an hour so it firms up. Cut it up into about 32 pieces and seal it in a ziplock bag so they stay fresh. Store in the refrigerator.

I bought Trader Joe's creamy unsalted peanut butter,
I suppose I should have bought a more natural honey but it's so expensive. This worked.

This is a marshmallow flavored protein shake powder.  I've used a chocolate one before and it tasted the same. I wouldn't try a berry flavor though.

Organic oats from Trader Joe's. 

I buy this flax seed at Costco and I use it to fortify everything my son eats.

Lining the pan makes for such easy clean up. 

Enjoy!!!

Monday, January 26, 2015

Slow Cooker Pesto Ranch Chicken

Hey guys! I hope your new year is going well and you're mostly sticking to your resolutions. I pretty much have. I've been slacking on the oil pulling but the others on my list, I've been doing.

I thought I'd share this super simple chicken recipe I found on Pinterest which came from Picky Palate. You will only need a few ingredients and a slow cooker to enjoy this dish.


Ingredients
2.5 lbs of frozen chicken thighs
6 ounces of pesto
1/3 cup red wine vinegar
1 packet of ranch dip mix


Place all of your frozen chicken thighs in the slow cooker.

Empty your jar of pesto right on top of your chicken.

Add 1/3 cup of red wine vinegar to the nearly empty jar of pesto. Shake it up to get all of the pesto out of the jar and add it to the chicken.

Add your packet of seasoning to your pesto and chicken. 

After you've added all of your ingredients into the slow cooker, try to distribute the pesto and ranch all over the chicken. Put the lid on and cook on low for 8 hours. You might need to add a little salt, I did, but my husband liked it without. I served this over pasta one night and the next day I ate it with rice.  


Enjoy! 

Tuesday, August 19, 2014

Non Dairy, Egg Free Pumpkin Ice Cream

Guys! Another ice cream recipe for ya! This one is nearly vegan because it uses honey.  You could omit it but I've already photographed my ingredients.  Too late for me! And honestly, it wasn't sweet enough with just the honey.  It was a little flat.  So I had to add a 1/4 cup of light brown sugar and pinch of salt.  All better.   


Ingredients 
15 ounces of coconut cream
15 ounces of pure pumpkin
15 ounces of full fat coconut milk
2 tsp pumpkin pie spice 
2 tsp vanilla extract 
4 ounces of honey
1/4 cup light brown sugar 
1/4 tsp salt 

To make the ice cream, you're going to combine all of those ingredients and then add them to your ice cream maker for 30 minutes.  Then it has to set up for at least 3 hours in the freezer. After 3 hours it will have a nice scoopable texture. After 24 hours, it's going to be rock hard. In order to serve it, it needs to sit on the counter for 20 minutes. 

You can see I topped mine with Hershey's Kisses.  Mmmm, so good.   
Enjoy! 

Monday, July 21, 2014

Chocolate Chunk Vegan Ice Cream

I don't know what's gotten into me but lately I've been obsessed with ice cream. While I do love dessert, ice cream is probably my least favorite. I still think it's delicious but if I can order cake or pie or creme brûlée, sorry ice cream.  

I posted last week that we had phenomenal ice cream at Cow A Bunga, which made the UT's list of San Diego's top 25 frozen desserts.  Then I took my son to Neveria Tocumbo for Bubulubu ice cream, also on the UT list, which was great and just like the candy bar.  I think that all that sampling got me thinking about breaking out the old ice cream maker that I used only once 12 years ago. 

Last summer my sister came home with a cashew based cherry ice cream.  It was outstanding and very expensive.  I knew I could recreate something like it for a fraction of the price.  And now that I'm obsessed with trying new ice creams, it's the perfect time to attempt it.  

I had researched tons of recipes and watched many YouTube videos on the subject and they all seemed pretty similar.   First thing's first, buy raw cashews. If you buy the pieces instead of whole ones, it's cheaper. I think I paid $4.99 for mine at Trader Joe's.   


Then you have to soak the cashews in water for 2-4 hours.  


Once they've soaked up the water, blend it up to a smooth texture. Mine reminded me of hummus. 


Then I added the lemon juice, coconut oil, simple syrup, and vanilla extract and blended again.  I think the next time I make it, I'll just blend everything together in one step instead of two.  

Trader Joe's has this nifty bundle of three dark chocolate bars. I chopped all three and set them in the freezer until it was time to add them to the cashew base. 


I added the cashew base to my ice cream maker and let it go for 20 minutes.  Around 15 minutes, it really started to thicken up and resemble a frozen treat.  While I was scooping it out of the mixing bowl and into its container, I added in the chocolate chunks.  

When I first set out to make this, I was going to add cherries.  Cherries and chocolate are one of my favorite dessert combos.  However, I wanted my husband to love it and he doesn't care for fruit in his sweets.  When he came home from work and my son told him what we made, the Mr. taste tested it on the spot. He was in love! He couldn't believe it was made of cashews and had to make an effort to not eat more before dinner. So, yay for me! It's beyond satisfying when my husband loves my food.  


The day of, the ice cream was easy to scoop and portion. Two days later, I was having a rough time even though I dipped my scooper in hot water.  I recommend leaving it out on the counter for 15 minutes before you eat it. 


Enjoy!

Ingredients

  • 2 cups raw cashews
  • 2 cups water
  • 3/4 cup simple syrup
  • 2 tablespoons coconut oil
  • 1 1/2 teaspoon vanilla extract
  • 1 tablespoon lemon juice
  • 5 ounces of chopped chocolate
Directions
  • Soak the cashews in the water for 2-4 hours
  • Blend up the cashews, water, simple syrup, coconut oil, vanilla extract, and lemon juice until smooth.
  • Add the mixture to your ice cream maker and let it go for 20 minutes. (if you don't have one, I think it's safe to freeze it in an airtight container.)
  • At this point it will resemble a soft serve which is great. You can also freeze for a couple more hours and it will be more like ice cream.

Wednesday, January 22, 2014

Lentils, Kale, and an Egg


In an attempt to eat better and less meat, I made the above dinner. It turned out great! My husband loved it! My 5 year old boy did not but I knew that was a possibility. 

The lentils are from Alton Brown. I googled "lentil soup recipe" and his recipe on FoodNetwork popped up. To find the kale recipe, I googled "fried egg over kale" and Poor Girl Eats Well was the number one hit. I had to alter the recipes just a little because I didn't have all of the ingredients.

Lentil Soup
Yields 6-8 servings
Total prep and cook time 1 hour 20 minutes

2 tbs coconut oil (that's what I had in my cupboard. Alton's recipe called for olive oil.)
1 cup chopped onion
1/2 cup chopped carrot
1/2 cup chopped celery
2 tsp salt
3 ounces tomato paste
1 pound lentils, rinsed
2 quarts veggie or chicken stock
1/2 tsp cumin
1 tsp 21 seasoning salute from Trader Joe's (Alton's recipe called for 1/2 tsp grains of paradise and 1/2 tsp coriander, neither of which I had in my pantry.)

Heat your oil over medium high in your big pot with a lid (I used a dutch oven) and add onion, carrot, celery, and salt. When the veggies are translucent roughly 8 min later, add the tomato paste.  Brown the heck out of that tomato paste for lots of flavor. It's ok if it gets stuck to the bottom of the pan. Add the stock a little at a time while stirring and bringing up the tomato paste and veggies that are caramelized to the bottom of the pot. After the stock has been added, pour in the lentils and seasoning. Bring the soup to a boil and reduce to a simmer over low heat. Cover the pot and walk away for about 45 minutes. The lentils should be tender. 


Garlicky Kale
1 tbs coconut oil
2 tsp minced garlic
2 cups of kale
salt

Over medium high heat, melt the coconut oil and then add garlic. Stir the garlic quickly and then add the kale. Saute till the kale is wilted, about 4 minutes. Sprinkle with salt. 


Once the kale is ready, make your egg however you'd like. I prefer mine over easy. Now it's time to assemble your dish. Ladle the lentils in the bowl, top with garlicky kale, and add your egg. Time to eat! Enjoy!


Monday, October 14, 2013

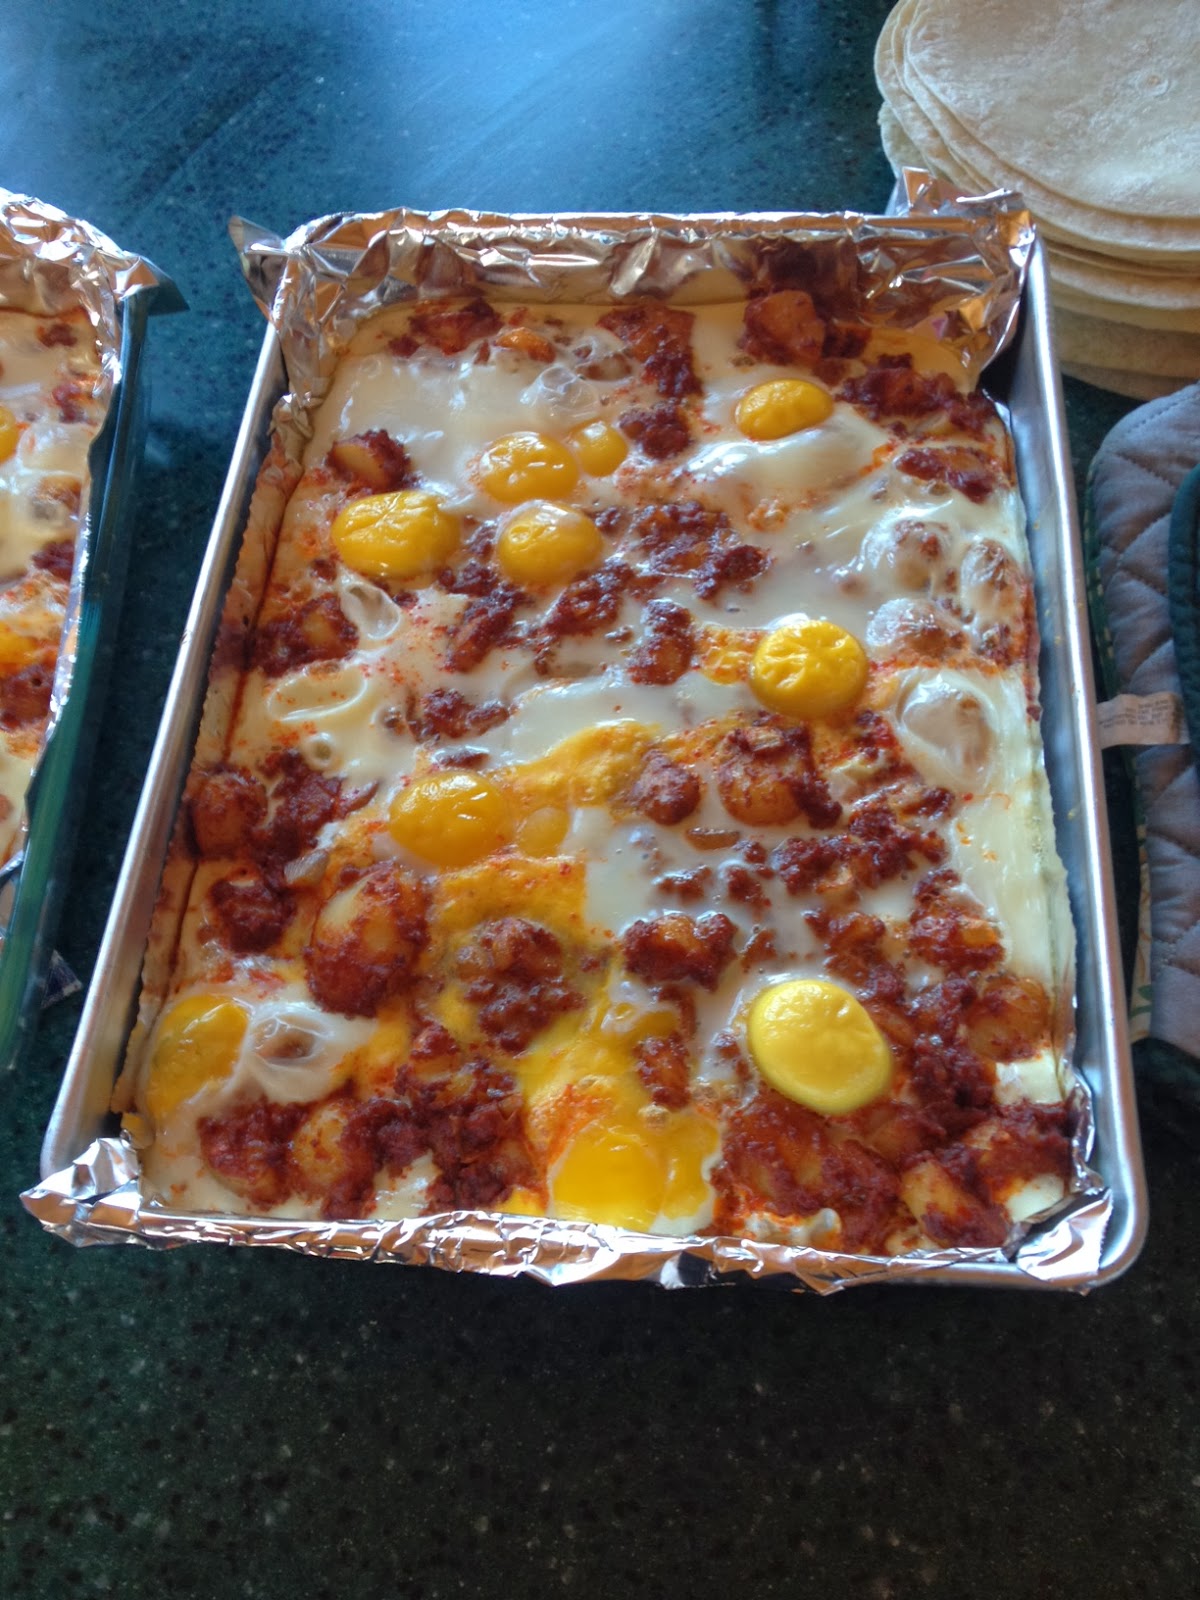
Baked Eggs Over Chorizo and Potatoes


Back to reality... I just spent a really fun weekend at a friend's gorgeous cabin home overlooking Lake Cuyamaca. We played games, we drank tons of wine and champagne, we ventured into Julian, and overall just had a perfect little weekend.  It was a really good group of couples, no drama, everyone just getting along.

Here are the ladies, tasting at Orfila. I enjoyed the 2008 Old Vine Zin and the 2012 Element 119 Pinot Noir.
I picked up these goodies at the Julian Cider Mill. This morning I added the apple butter to my son's peanut butter sandwich. I'm hoping he eats it all. He's been a terrible eater lately.

Before going, we divided up the meals. Let me tell you what a treat this was. We did this when we went camping too. Each couple was responsible for a meal and by doing that, we get to taste what other people cook. One of my favorite things in the world is eating a home cooked meal, THAT SOMEONE ELSE PREPARED. We had Mike's famous lasagna, garlic bread, breakfast burritos, we had meatballs, buffalo chicken dip, nachos and more. Such a treat!

My turn to provide a meal was Sunday morning. After consulting a foodie friend of mine, I decided to make baked eggs over chorizo and potatoes. I found the recipe on Food and Wine's website. This recipe was pretty spot on and I only changed a few things to make it easier to prepare.


Browning the potatoes
Chorizo and onion mixture

The finished product

The perfect bite!

This recipe serves 5 and will take about 45 minutes to prepare.

Ingredients
3  16 ounce cans of whole potatoes
2  10 ounce Mexican pork chorizos
10 eggs
1/2 large sweet Mayan onion
10 tortillas

Directions
Preheat oven to 400 degrees.
Chop up your canned potatoes and set aside.
Heat your pan over high heat and cut open the chorizo. Break down that chorizo and move around. It's done when the stringiness is gone and it's brown.
Chop your onion and add.
Cook and stir the chorizo and onion mixture for 5 minutes and empty it into a separate bowl.
Put your chopped potatoes into the pan and season them with salt and pepper. Cook them until they brown up, about 5 minutes.
Add the chorizo mixture to the potatoes and combine.
In a 9x13 pan (I lined mine with foil for easy clean up), add the chorizo and potatoes.
Using a spoon, try to make little dents for your eggs and crack your eggs into the dents.
Bake for 10 minutes. It's done when the whites of the eggs are opaque.
Enjoy with tortillas.

Monday, May 20, 2013

Mushroom Pizza Bites


I love finding inspiration on Pinterest. I pin my diet food on a board called, I'm On A Diet. Me and my low carb dieting phases...  I ran across a pin called Mushroom Pizza Bites. Inspiration! I thought, I can put whatever I want in a mushroom and call it a pizza. Sweet! Fresh marinara like my husband's grandmother taught me to make, salami, and full flavor mozzarella cheese were going into my mushrooms.

The original author at MyP90Xnutritionplan.com uses marinara, low fat mozzarella, egg white, and turkey pepperoni to fill the mushrooms. The site gives a more detailed recipe including measurements (I just eyeballed it.)


These were really delicious and not terribly difficult to make. The hubs liked them, so that's a huge win for me. Also, I loved making these because there's no real measuring that needs to be done. You can make these however you'd like. Enjoy!

I bought these at Trader Joe's. I think other mushrooms could work too but these are a really nice size. Two and a salad make a decent portion dinner. 


After you wipe the tops of your mushrooms, cut out the stem and then scrape off the gills with a  spoon. Throw these on a lined baking sheet and bake at 400 for 8 minutes. 


After their 8 minutes in the oven, top them however you would top your pizza.  Back in the 400 degree oven for about 5 minutes or until your little pizzas are melty and brown.


YUM. I thought they could use a little more cheese. I topped them again and back in the oven they went until the cheese was melted. 


Dinner is served! 

Wednesday, January 16, 2013

Posole

My little boy is obsessed with Pixar movies. He has every line and song memorized. It's funny how much these flicks have influenced him, from food to athletics. I can thank Ratatouille for peaking my son's interest in Paris and soup, Linguine soup to be exact.  If you've seen the movie, you'll recall when Alfredo Linguine and Remy add their own touch to the restaurant's soup and a food critic likes it. My son held on to that and now refers to all soups as Linguine soup and asks for it. That's cool with me. I'm happy anytime my son wants to eat something that's not pepperoni pizza or m&m's.  

I haven't had a soup post on The Good Life, well, not too many savory posts at all. I do love baking so much. :)  However, the cold winter weather has been begging me to make soup, so has the Mr.  I got to thinking that my mom makes great posole for Sunday night dinners and my little family really enjoys it. I love it too but I skip the hominy. Since my mom never makes it the same way and makes it up as she goes, I did a little web searching. I found Emeril Lagasse's recipe on Food Network's website and decided I would use it but make my own modifications based on my pantry.  

This is my successful attempt at making posole (Linguine Soup.) This recipe is easy, straightforward, and doesn't require any weird ingredients. Those are pluses for me. Also, this recipe makes enough soup to feed three families for two nights. Really, it's a lot. If you don't have storage for leftovers, consider halving the recipe.  Me? I love leftovers so that doesn't apply.


I butchered this pork shoulder and one more. That was the most difficult part of the recipe. You could skip this and purchase stew meat already cut up but it's more expensive.
I did it! I butchered pork shoulder! It might be the last time though.
This is my pile of onion. I used a box grater to "chop" onions. You can see there are some bigger pieces and I tried to get them smaller with my knife but was satisfied with uneven pieces.  It didn't make a difference in the finished product.
After the meat is browned and the onions have softened, add in your two cans of diced tomatoes. Easy.
Emril's recipe calls for pork broth but this is what I had on hand. I also made some pork broth with the bones of the shoulder I butchered. Add 12 cups of water, 4 tablespoons salt, 4 celery stalks, 4 carrots, and 6 cloves of garlic to the pork bones. Boil and reduce to a simmer for 30 minutes or longer if you have the time. 
Posole! I garnished with cilantro, sour cream, and shredded cheese. 
Ingredients
  • 2 tablespoons vegetable oil
  • 7 pounds pork shoulder
  • 2 tablespoons paprika
  • 2 tablespoons salt
  • 2 teaspoons black pepper
  • 1 tablespoon cayenne pepper
  • 1 tablespoon dried oregano
  • 2 cups chopped onions
  • 2 cans of diced tomatoes. I think they come in 14 ounce sizes. 
  • 2 tablespoons chopped garlic
  • Pinch of crushed red pepper flakes
  • Pinch of cumin
  • 2 chopped chipotle chilies in ancho sauce
  • 4 quarts pork or chicken or vegetable stock. Whatever you have.
  • 1 29 ounces can of hominy
  • Salt and pepper
  • Garnishes: cilantro, shredded cheese, radishes, hot sauce, raw chopped onion
Directions
  • Butcher the meat. Here's a tutorial. Good luck. Or you can buy the meat already butchered.  Look for stew meat.
  • Combine the paprika, salt, pepper, cayenne, and oregano. Rub into the pork. You'll have some leftover. Save it or toss it.
  • Heat the oil in a large pot, like one that takes up two burners, over medium high heat. 
  • Sear the meat on all sides.
  • Add the chopped onions and cook for a couple of minutes.
  • Add tomatoes, garlic, red pepper flakes, cumin, chipotle chilies and stock.
  • Bring to a boil and reduce to a simmer for about 30 minutes. 
  • Season with salt and pepper. 
  • Add hominy and cook for another 20 minutes. 
  • It is now ready to serve and garnish. Let me say though, this soup is even better the next day.
Enjoy!!!

Tuesday, December 18, 2012

Low Carb Cauliflower Crust Pizza


This is one of my low carb go to recipes. I know that many people could easily be skeptical simply because the crust is made of veggies and not real pizza dough. Let me reassure you though, if you have been low carb dieting and are getting bored and burning out, this kind of meal will provide you with the variety you need. Best of all, this is a cinch to make and it's delicious.

I've probably made ten of these over the last year. And I think I've finally got it perfected, at least my picky not-on-a-diet husband says so. What made the difference this time was wringing out the cooked grated cauliflower. Removing the moisture gives the crust more of a bread like texture.

I made this in a greased spring form pan. If you don't have one, just use your 9 inch round cake pan or you could do this on a cookie sheet with some parchment paper to keep it from sticking.

This makes enough for two people but my husband says he could eat the entire thing. :)

Ingredients
1/2 head of cauliflower
1 beaten egg
1/3 cup parmesan cheese
2 tablespoons pizza seasoning (use whatever Italian herbs you have)
2 tablespoons marinara
1 cup of shredded cheese (I used cheddar and feta)
Feel free to add any other toppings. I had leftover meatballs I cut in half and added. (but not in the photo I used above.)

Directions
Preheat oven to 400F.
Grate the cauliflower and microwave it for 3 minutes.
Let it cool down so you can handle it without burning yourself.
In your hands or in a cheese cloth, wring out all of the water from the cauliflower.
Add the egg, parmesan, and pizza seasoning and combine.
Prepare your pan by greasing it.
Add the cauliflower mixture to the pan and press it in evenly.
Cook for 18-20 minutes or until it is golden.
Add your marinara, cheese, and toppings and put it back in the oven for another 8-10 minutes or until cheese is all melted.

P.S. my friends, I will be reposting this entry after New Years. You'll appreciate it. Enjoy!!

Thursday, September 20, 2012

Macadamia Oatmeal Cookies with Peanut Butter Filling


I made these tasty little sandwich cookies for a birthday party earlier in the summer. I haven't been baking all that much lately because it's been so darn hot and I'm trying to cut down on my taste testing, if you know what I mean. So here's a look back at a delicious cookie that I will be making again once the temperature in San Diego drops. 
This recipe is from Joy The Baker. I've given you the list of ingredients but you'll have to click through to Joy's blog to grab the directions. Thanks for stopping by! Enjoy these cookies!

This recipe yields about 20 cookies. 

Ingredients for the cookies
1/2 cup softened butter
1 cup brown sugar
1 egg
1 tsp vanilla extract
1 1/4 cup oats (the original recipe calls for old fashioned oats but I use instant all the time. Use what you have on hand.)
1 cup flour
1/2 tsp baking powder
1/2 tsp baking soda
1/2 tsp salt
1 tsp ground cinnamon
1/4 tsp ground nutmeg
1/2 cup chopped macadamia nuts (the original recipe calls for pecans but I didn't have those in my pantry)

Ingredients for the filling
3 tbsp softened butter
1/2 cup creamy peanut butter
1 cup powdered sugar
3-4 tbsp milk

Sunday, July 22, 2012

Reese's S'mores Rice Krispies Treats.

For the past month, I've been prepping for a very special baby shower. My dear friend Sarah is expecting her first child and I couldn't be more excited. My plan was to be in charge of the dessert table, oh the possibilities.

I was going to make a sheet cake, cupcakes, chocolate chip cookies, brownies, daisy sugar cookies, and snickerdoodles. I got all of those done and out of the way. I was so so happy to be finished and ready to get on with the party. Then I speak with Sarah and she tells me that she's been craving Reese's peanut butter cup s'mores. That conversation got me thinking that I needed to make one more thing for the dessert table to satisfy the mama to be's cravings.

And here it is folks! Reese's S'mores Rice Krispies Treats. Super easy and incredibly delicious.


Ingredients
Directions
  • Unwrap the peanut butter cups, chop them, and set aside.
  • Grease your 9x13 pan. I use the stick of butter like a chapstick.
  • Melt the butter over low heat in a non stick pot. I use a stock pot.
  • Add the marshmallows to the butter and stir until completely melted.
  • Turn off the heat and incorporate the cereal in. 
  • Crumble up the graham crackers and add them.
  • Add the marshmallow bits and peanut butter cups quickly or they'll melt too much. 
  • Press into your pan and let set up in the fridge for a couple of hours. I make this the day before so it's nice and firm for cutting and plating.
  • If you'd like, you can add a couple more PB cups and marshmallow bits to the top of the treats. It'll look pretty that way. 
Enjoy!!
Dessert table brought to you by The Good Life.
My sister in law took these photos at the shower and made this collage. Pretty, right?
I'm on the left and that's my Sarah on the right, all beautifully pregnant.

Monday, June 18, 2012

My 1st Carrot Cake


How about that bowl of freshly grated carrots?  This recipe calls for carrots, duh, and instead of just doing the convenient thing, buying shredded carrots, I buy whole organic carrots. I know my kiddo will want them and I'll sacrifice the time and effort so we can have them in the cake. Oh brother! If you want to do that too, go ahead. Or, you can save yourself a little time and a huge mess and just buy the carrots already grated.  
 
This recipe came from one of my mom's garage sale adventures.  She found a book compiled completely of brand name recipes. I'm sure I've said this before, brand name recipes are always good. Those companies want you to use their products so they work hard to create easy delicious recipes. 

Inside Great American Brand Name Recipes Cookbook were many 80's gems, including this carrot cake from Crisco, that's been lightly adapted.  It's been a while since a recipe told me to use a 9x13 pan. I'm not going to complain though. That's the easiest cake to make. I don't have to split and fill anything or carefully ice the sides. Just bake it in the pan, cool, and slather cream cheese frosting. 
 

Ingredients for Cake
2.25 cups flour
1.5 cups sugar
2 tsp baking soda
1.5 tsp ground cinnamon
.5 tsp ground nutmeg
.5 tsp salt
1 cup veggie oil
3/4 cup sour cream
3 eggs
.5 cup milk
2 cups shredded carrots or 4 whole carrots
1.5 cups sweetened flaked coconut
3/4 cup sliced almonds
1.25 cup raisins

Ingredients for Cream Cheese Frosting
1 stick of room temp butter
8 ounces of room temp cream cheese
3.75 cups of powdered sugar
2tsp vanilla


Directions
Preheat oven to 325. Butter a 13x9 baking pan. 
Mix flour, sugar, baking soda, cinnamon, nutmeg, and salt in a large bowl. 
Add oil, sour cream, eggs, milk, and milk.
On low speed mix ingredients until they are all moist. Make sure to scrape down the sides of the bowl.
Beat on medium speed for two minutes.
Fold in coconut, almonds, and raisins.
Pour into the 9x13 pan.
Bake for 55 minutes. I checked mine at 45 minutes. Test the cake by inserting a knife or toothpick into the center of the cake. If it comes out clean, it's ready to go.
Cool completely.

Cream Cheese Frosting
In your stand mixer or with your electric beaters, combine the butter and cream cheese. 
Add the vanilla extract and 1 cup of powdered sugar.
Mix. When it's combined, add another cup of powdered sugar. 
Repeat until all the powdered sugar is incorporated. 
Then beat on medium for two minutes or until light and fluffy. 
Slather this on top of your carrot cake after the cake has completely cooled and store in the refrigerator.